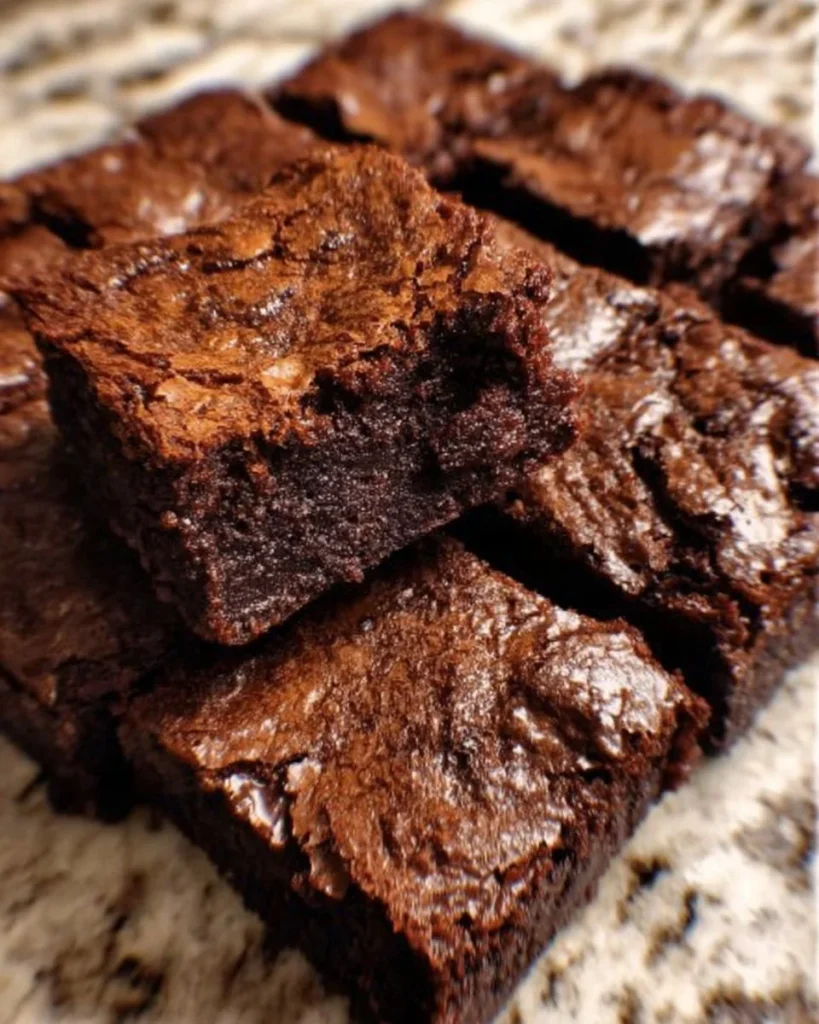
You know those moments when you just need something chocolatey, gooey, and comforting? That’s exactly why I’m excited to share my go-to brownie recipe with you. These aren’t just any brownies; they are rich, fudgy, and absolutely melt-in-your-mouth delicious. Picture this: You come home after a long day, and the sweet aroma of freshly baked brownies wraps around you like a warm hug. Trust me—once you’ve made these, you’ll never want to go back to boxed mix again!
Why you’ll love this recipe
So, why should you give this recipe a whirl? For starters, these brownies strike that perfect balance between a fudgy interior and a slightly crinkly top that begs for a scoop of vanilla ice cream. We’re using melted butter and two types of sugar here to really enhance that deep, almost caramel-like flavor. Plus, the unsweetened cocoa powder packs a punch of chocolate richness while the optional chocolate chips offer those delightful melty morsels that you just can’t resist!
What makes this brownie recipe special is its simplicity. You don’t need any fancy equipment, and you can whip it up in under an hour—from melting the butter to slicing the warm batch. It’s a straightforward, stress-free process that delivers serious satisfaction. Plus, you can customize it any way you like by adding nuts, different kinds of chocolate, or even a hint of espresso. Trust me; your friends and family will think you’ve been slaving away for hours!
Gather these ingredients
To create these luscious brownies, you’ll need:
Unsalted Butter – 1/2 cup (1 stick / 115g), melted. This rich fat makes everything better, trust me! If you’re in a pinch, you can sub it with coconut oil—but butter is key for that classic brownie flavor.
Dark Brown Sugar – 1/2 cup (100g), packed. This adds a deep, moist sweetness. Light brown sugar works too if that’s all you have.
Granulated Sugar – 1/2 cup (100g). A classic sweetener to balance out the depth of the brown sugar.
Large Eggs – 2, at room temperature. This helps in emulsifying the batter, giving you that ideal fudgy texture.
Vanilla Extract – 1 teaspoon. Essential! It elevates the flavor of your brownies and adds a lovely aroma.
All-Purpose Flour – 1/2 cup (60g). This provides structure. If you’re gluten-free, consider a 1:1 baking flour substitute.
Unsweetened Cocoa Powder – 1/2 cup (40g). Make sure it’s unsweetened so we control the sweetness ourselves and really let that chocolate flavor shine.
Salt – 1/4 teaspoon. Just a pinch brings out all the flavors, trust me on this!
Baking Soda – 1/4 teaspoon. This little leavener helps give the brownies just a tad of lift.
Semisweet Chocolate Chips – 1/2 cup (4 ounces, optional). If you truly want to take these brownies over the top, throw some chocolate chunks in there! If you prefer dark chocolate, go for it!
The cooking process explained
Start by melting the butter in a large bowl—microwave, double boiler, or stovetop; your call! Nuke it just until it’s all melted—30 seconds should do, but keep an eye on it.
Once melted, add the brown sugar and granulated sugar to the buttery goodness. Whisk it together while it’s still warm to get a good dissolve.
Now, crack in those room-temperature eggs and mix in the vanilla extract. Whisk like you mean it until everything is smooth and combined. Are you smelling it yet?
Time to bring in the dry ingredients! Add the flour, cocoa powder, salt, and baking soda. Gently fold it all together. Don’t overmix—just until you can’t see any more flour. It’s magic!
If you’re feeling indulgent, toss in those chocolate chips and give them a few folds to incorporate.
Pour the luscious batter into a greased or parchment-lined baking dish—8×8 inches works best. Spread it out evenly.
Slide that beauty into a preheated oven at 350°F (175°C) and bake for 25 to 30 minutes. You’ll know it’s done when a skewer inserted into the center comes out clean or with a few moist crumbs clinging.
Let those brownies cool in the dish for 10-15 minutes, then transfer them to a wire rack. It’s hard, but slicing them too early will ruin that fudge factor—trust me!
Best way to enjoy it
Serving these brownies is where the real fun begins! While they’re still warm, consider drizzling some melted chocolate over the top or pairing them with a hefty scoop of ice cream. For something a bit different, sprinkle with chopped nuts or even sea salt to enhance the sweetness.
If you’re feeling adventurous, try serving them with a dollop of whipped cream and fresh berries for a more sophisticated take—or go all out and create an epic brownie sundae! The possibilities are endless!
Keeping leftovers fresh
Storing your brownies properly is just as important as making them. If you happen to have any leftovers (a big if, honestly), let them cool completely before transferring them to an airtight container. They should keep at room temperature for about 3 days, but I recommend wrapping them individually in plastic wrap for a fresher bite each time.
If you need them to last longer, consider freezing them! Just slice them up, wrap securely, and store in a freezer bag for up to 3 months. When you get a craving, simply let them thaw on the counter—easy-peasy!
Pro chef tips
Room Temperature Ingredients: Always use room temperature eggs for easy incorporation into the batter.
Don’t Skip the Salt: This is crucial! It heightens all the flavors and balances the sweetness perfectly.
Bake Time: Keep an eye on those last minutes of baking. Every oven is different, and you want that perfect fudgy texture—slightly underbaking is better than overbaking!
Creative Twists
Feeling like putting your own spin on these brownies? Here are a couple of ideas:
- Nutty Brownies: Add chopped walnuts or pecans to the batter for some added crunch.
- Mint Chocolate: Swap half of the cocoa powder for some mint-flavored cocoa or add mint extract for a refreshing twist.
- Stir in some espresso powder to amplify the chocolate flavor—it’s like adding a secret weapon!
Your questions answered
How long do they take to prepare?: From start to finish, you’re looking at about 30-40 minutes, including bake time!
Can I use other types of chocolate?: Absolutely! Dark chocolate, white chocolate, or even flavored varieties can add interesting notes to your brownies.
Should I let them cool completely before slicing?: Yes! For the best texture, allow them to cool a tad before slicing.
Can these brownies be made ahead of time?: Without a doubt! Bake them the day before and let them sit in an airtight container overnight.
What’s a good pairing for brownies?: These brownies pair fabulously with coffee or dessert wines! Or serve with whole milk for that classic combo!
Making brownies shouldn’t be a chore but a delightful experience. You’ll end up with a treat that brings joy, comfort, and sweetness into your home. I encourage you to personalize this recipe, be daring in your flavor combinations, and share your tasty experiments with friends and family. I can’t wait to hear how yours turn out!

Best Brownie Recipe
Description
These brownies are rich, fudgy, and absolutely melt-in-your-mouth delicious, perfect for satisfying any chocolate craving.Ingredients
Brownie Batter
Instructions
Baking the Brownies
Melt the Butter
In a large bowl, melt the unsalted butter, until completely liquefied.Microwave, double boiler, or stovetop can be used.Mix Sugars
Add the dark brown sugar and granulated sugar to the melted butter and whisk together until dissolved.Do this while the mixture is still warm.Add Eggs and Vanilla
Crack in the room temperature eggs and mix in the vanilla extract. Whisk until smooth.Combine Dry Ingredients
Fold in the flour, cocoa powder, salt, and baking soda until no dry ingredients are visible.Avoid overmixing.Add Chocolate Chips
If desired, fold in the semisweet chocolate chips.Bake the Brownies
Pour the batter into a greased or parchment-lined 8x8 inch baking dish and spread evenly. Bake at 350°F for 25-30 minutes.Done when a skewer inserted into the center comes out clean or with moist crumbs.Cool and Serve
Let cool in the dish for 10-15 minutes before transferring to a wire rack to cool completely.Slice only when cooled to maintain the fudgy texture.
Nutrition Facts
Servings 16
- Amount Per Serving
- Calories 200kcal
- % Daily Value *
- Total Fat 10g16%
- Saturated Fat 6g30%
- Trans Fat 0g
- Cholesterol 50mg17%
- Sodium 40mg2%
- Potassium 100mg3%
- Total Carbohydrate 30g10%
- Dietary Fiber 1g4%
- Sugars 20g
- Protein 3g6%
- Vitamin A 0 IU
- Vitamin C 0 mg
- Calcium 10 mg
- Iron 1 mg
* Percent Daily Values are based on a 2,000 calorie diet. Your daily value may be higher or lower depending on your calorie needs.