There’s something about the indulgence of brownies that warms the heart, but when you add the velvety charm of tiramisu into the mix, it’s like a hug from the inside. This Tiramisu Brownie recipe has been a cherished favorite of mine for quite some time. I stumbled upon it one rainy afternoon while scouting the internet for a sweet remedy and, boy, did it deliver! Each bite feels like you’re getting whisked away to a cozy café in Italy. Can you imagine? The luscious layers of chocolatey goodness, kissed with espresso and creamy mascarpone, are simply divine.
Why you’ll love this recipe
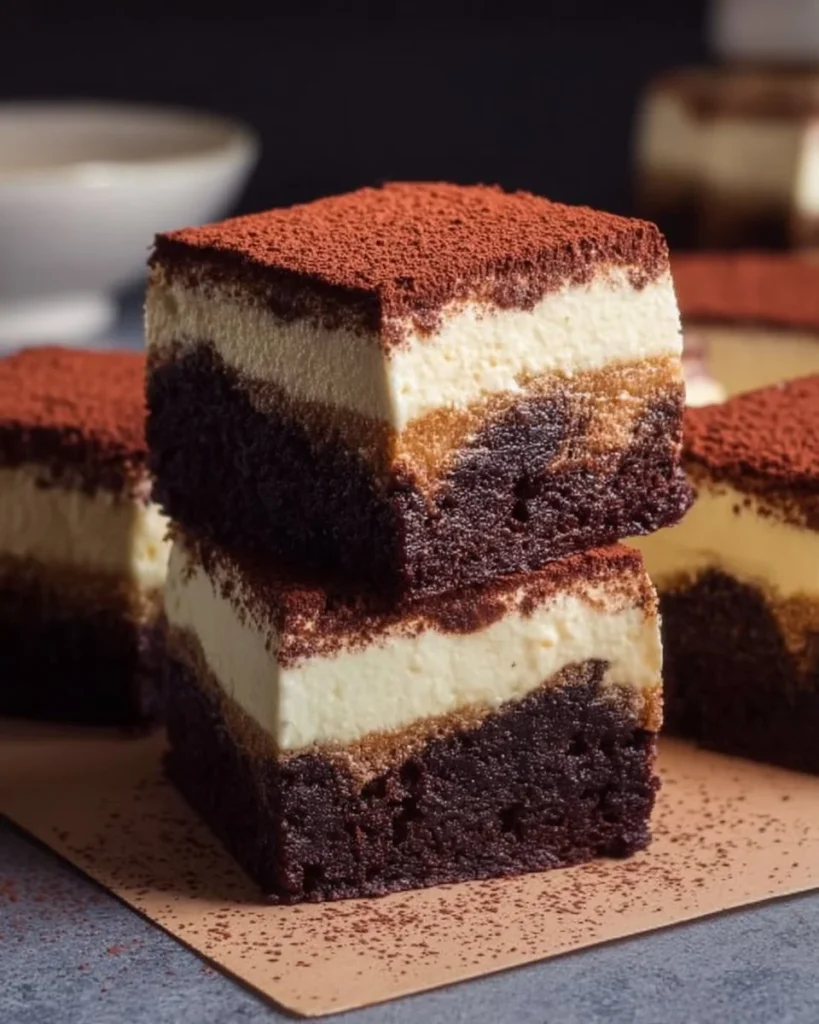
If you’re looking for a creative twist on a classic treat, these Tiramisu Brownies are a game-changer. They combine the best of both worlds: the rich, fudgy texture of brownies and the light, creamy layers of traditional tiramisu. Why stick to plain ol’ brownies when you can indulge in this heavenly mashup?
The decadent flavor profile is what truly sets them apart. The harmonious pairing of chocolate and coffee hits every note perfectly, dancing on your taste buds and leaving you in a state of bliss. Plus, who doesn’t love a dessert that looks as good as it tastes? Perfect for impressing guests or treating yourself after a long day, these brownies are the culinary equivalent of a warm embrace. Picture yourself savoring a piece with a cup of coffee, maybe even garnished with a sprinkle of cocoa or a twist of orange zest—now that’s what I call a delightful afternoon!
Gather these ingredients
Let’s gather the goodies, shall we? Here are the essentials you’ll need to whip up these scrumptious delights:
Unsalted butter (1/2 cup): Opt for unsalted to control the saltiness and get that rich flavor just right. Pro tip: browning the butter adds a nutty depth that’s simply magical.
Granulated sugar (1 cup): This is the sweet backbone of your brownies. It’ll caramelize beautifully as the brownies bake, creating that heavenly crust.
Large eggs (2 eggs): They add moisture and binding to your batter, giving it that perfect fudgy texture.
Vanilla extract (1 teaspoon): The warm, inviting aroma of vanilla elevates the chocolate notes. You can use homemade vanilla for an even richer flavor!
All-purpose flour (1/2 cup): A small amount goes a long way to hold these brownies together without making them cake-like.
Unsweetened cocoa powder (1/4 cup): This adds a wonderful depth of chocolatey flavor. Go for high-quality cocoa to really supercharge your brownies!
Salt (1/4 teaspoon): Just a pinch to heighten the sweetness and balance flavors.
Ladyfingers (1 cup, cut into pieces): These spongey delights are the stars, soaking up that espresso and keeping it airy.
Strong brewed espresso (1/2 cup, cooled): This is the soul of tiramisu, bringing that signature coffee flavor. Feel free to use decaf if you’re sensitive to caffeine!
Mascarpone cheese (1 cup): The creamy richness of mascarpone is essential. If you can’t find it, a blend of cream cheese and heavy cream can work as a substitute.
Heavy cream (1/2 cup): This added creaminess helps create that iconic tiramisu texture. Make sure it’s cold for best results.
Powdered sugar (2 tablespoons): Just a little sweetness in the creamy top—not too much to overpower the chocolate and coffee.
Preparing Tiramisu Brownies
Alright, let’s dive into creating this masterpiece. Ready? Here’s how you put it all together in simple steps:
Preheat your oven to 350°F (175°C) and grease an 8×8 inch baking dish.
In a saucepan, melt the unsalted butter over medium heat. Keep an eye on it, swirling occasionally until it turns fragrant and golden brown—this is where the magic begins.
In a bowl, mix the browned butter and granulated sugar until well combined. The sugar should melt slightly into the butter—this is key for a smooth brownie.
Add in the eggs and vanilla extract, mixing thoroughly until you have a luscious batter.
In another bowl, whisk together flour, cocoa powder, and salt. Gently fold this dry mixture into the wet ingredients until just combined. Avoid overmixing!
Pour this rich brownie batter into your prepared baking dish and spread it out evenly.
Bake for 20-25 minutes, or until a toothpick comes out with just a few moist crumbs attached. Remember, it’s better to underbake slightly than to overdo it!
Once cooled, soak your ladyfingers in the cooled espresso. Layer these over the cooled brownies, creating a delicious spongey layer.
In a separate bowl, whip the mascarpone cheese, heavy cream, and powdered sugar until smooth and fluffy. This creamy concoction is going to be the crowning glory!
Spread this luscious cream over your layer of ladyfingers.
Chill these tiramisu brownies in the fridge for at least 2 hours before serving. Patience, my friend—it’s worth it!
Best way to enjoy it
When it’s finally time to serve, slice your tiramisu brownies into generous squares and maybe even dust the top with a sprinkle of cocoa powder for that cafe-level presentation. They pair beautifully with a strong espresso or a velvety cappuccino. If you’re feeling a bit adventurous, try serving them with a scoop of vanilla ice cream on the side—who doesn’t love a warm brownie with cold ice cream?
Keeping leftovers fresh
If by some miracle you have leftovers (good luck with that!), store them in an airtight container in the fridge where they can stay fresh for up to 4 days. Just a quick note: they get better as the flavors meld together, so don’t hesitate to indulge in those next-day bites! For longer storage, you can freeze the brownies but be sure to wrap them tightly in parchment paper followed by plastic wrap.
Extra tips and advice
Use quality ingredients: Always go for the best cocoa, espresso, and mascarpone you can find—trust me, it makes a difference.
Make ahead: These brownies can easily be made a day before your event. The chilling time allows the flavors to develop beautifully.
Temperature matters: Ensure your mascarpone and heavy cream are cold before whipping; it will whip up to a better texture.
Creative Twists
Feeling experimental? Here are some fun variations you might want to try:
Flavor deviations: Swap the espresso for a flavored coffee liqueur for an adult twist.
Nutty bites: Fold in some toasted hazelnuts or almonds into the brownie batter for an added crunch.
Stir in spice: A pinch of cinnamon in the brownie batter can give it a warming, comforting touch.
Ingredients list
- 1/2 cup unsalted butter
- 1 cup granulated sugar
- 2 large eggs
- 1 teaspoon vanilla extract
- 1/2 cup all-purpose flour
- 1/4 cup unsweetened cocoa powder
- 1/4 teaspoon salt
- 1 cup ladyfingers, cut into pieces
- 1/2 cup strong brewed espresso, cooled
- 1 cup mascarpone cheese
- 1/2 cup heavy cream
- 2 tablespoons powdered sugar
Directions to follow
- Preheat the oven to 350°F (175°C) and grease an 8×8 inch baking dish.
- Brown the butter in a saucepan over medium heat until fragrant.
- Mix the browned butter with granulated sugar until combined.
- Add eggs and vanilla, mixing well.
- In another bowl, whisk flour, cocoa, and salt, then fold into the wet ingredients.
- Spread the batter in the prepared dish.
- Bake for 20-25 minutes or until a toothpick comes out mostly clean.
- Cool the brownies and soak ladyfingers in the cooled espresso, layering over the brownies.
- Whip together mascarpone, heavy cream, and powdered sugar until fluffy and spread over the ladyfingers.
- Chill in the refrigerator for at least 2 hours before serving.
Your questions answered
How long does it take to prepare? Prep time is about 15 minutes, and the baking time is around 25 minutes, plus chilling time.
Can I make this a gluten-free dessert? Absolutely! Swap the all-purpose flour for your favorite gluten-free blend.
What if I don’t have mascarpone cheese? Try using a blend of cream cheese and heavy cream for a similar texture, or even ricotta cheese can work in a pinch.
Can I use instant coffee instead of brewed espresso? Yes, but dissolve the instant coffee in an equal amount of hot water to mimic brewed espresso.
Are these brownies good for special occasions? Absolutely! They make a show-stopping dessert for parties, potlucks, or any special celebration.
If you’ve made it this far, you’re only a few steps away from culinary bliss! Each layer of these Tiramisu Brownies brings joy, indulgence, and a little bit of that feel-good, comforting magic we all crave. Give it a try, personalize it to your taste, and share the love with those around you. I can’t wait to hear how yours turns out!

Tiramisu Brownies
Description
These Tiramisu Brownies combine rich, fudgy brownie texture with the creamy layers of traditional tiramisu, offering a decadent dessert experience.Ingredients
Brownie Base
Tiramisu Layers
Instructions
Preparing the Brownies
Preheat Oven
Preheat your oven to 350°F (175°C) and grease an 8x8 inch baking dish.Brown the Butter
In a saucepan, melt the unsalted butter over medium heat until it turns golden brown.Mix Sugar and Butter
Combine the browned butter with granulated sugar until melted and well combined.Add Eggs and Vanilla
Beat in the eggs and vanilla extract until the mixture is smooth.Combine Dry Ingredients
In a separate bowl, whisk the flour, cocoa powder, and salt, then fold into the wet ingredients.Avoid overmixing.Bake the Brownies
Spread the batter in the prepared dish and bake for 20-25 minutes.Toothpick should come out with a few moist crumbs.
Assembling the Tiramisu
Layer Ladyfingers
After cooling, soak the ladyfingers in cool espresso and layer them over the brownies.Whip Cream
In a bowl, whip mascarpone cheese, heavy cream, and powdered sugar until fluffy.Add Cream Layer
Spread the whipped mascarpone mixture over the ladyfingers.Chill Before Serving
Chill the assembled brownies in the fridge for at least 2 hours before cutting and serving.
Nutrition Facts
Servings 16
- Amount Per Serving
- Calories 350kcal
- % Daily Value *
- Total Fat 20g31%
- Saturated Fat 10g50%
- Trans Fat 0g
- Cholesterol 80mg27%
- Sodium 150mg7%
- Potassium 200mg6%
- Total Carbohydrate 36g12%
- Dietary Fiber 2g8%
- Sugars 20g
- Protein 5g10%
- Vitamin A 500 IU
- Vitamin C 0 mg
- Calcium 50 mg
- Iron 1 mg
- Vitamin D 0 IU
- Vitamin E 1 IU
- Vitamin K 1 mcg
- Thiamin 0 mg
- Riboflavin 0.2 mg
- Niacin 0.5 mg
- Vitamin B6 0 mg
- Folate 10 mcg
- Vitamin B12 0 mcg
- Biotin 0 mcg
- Pantothenic Acid 0.2 mg
- Phosphorus 100 mg
- Iodine 0 mcg
- Magnesium 15 mg
- Zinc 0.5 mg
- Selenium 0 mcg
- Copper 0.1 mg
- Manganese 0.3 mg
- Chromium 0 mcg
- Molybdenum 0 mcg
- Chloride 0 mg
* Percent Daily Values are based on a 2,000 calorie diet. Your daily value may be higher or lower depending on your calorie needs.