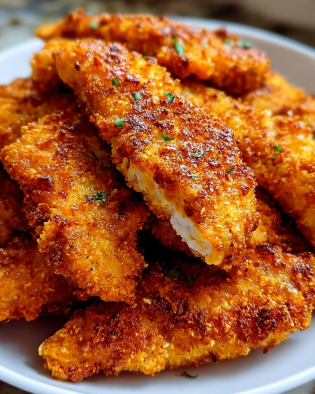
Ah, homemade baked chicken tenders—what a fantastic choice! Whenever I whip these up, I’m taken back to those cozy family dinners where the chicken was always the star. Crispy on the outside, tender on the inside—can you picture it? Their golden brown hue beckons with the promise of comfort and warmth. Let me share my favorite secrets with you; trust me, this recipe will become a staple in your kitchen!
Why you'll love this recipe
You might be wondering, “What makes these chicken tenders stand out?” Well, let me tell you—these aren’t your average tenders. They are baked, not fried, which means they capture all that satisfying crunch while being a little lighter. Each bite is robustly flavored thanks to the spices I’ve mixed in. The garlic powder and paprika create a warm, inviting aroma that fills your home and wraps around you like a cozy blanket on a chilly night.
Plus, they’re incredibly versatile. You can serve them as a dinner centerpiece, a delightful snack for game day, or even pack them in your kids' lunchboxes for a treat that’s sure to delight. Not to forget, they’re a healthier option that doesn’t skimp on flavor or fun. Who could resist chicken tenders made from scratch? You're going to be the hero of weekend lunches and family gatherings!
Gather these ingredients
To bring these tenders to life, you’ll need some key players. Let’s break them down.
- 1 pound of chicken breasts, cut into strips—this lean meat is the foundation of your tenders. I prefer breast meat for its tenderness, but you can easily switch to chicken thighs for a richer flavor.
- 1 cup of breadcrumbs—this is what creates that delicious crispy shell. Try using panko for an extra crunch! If you’re gluten-free, there are fantastic gluten-free breadcrumbs available too.
- 1/2 cup of flour—this helps the egg stick to the chicken and adds another layer of texture. Feel free to swap it out for almond flour or another type of gluten-free flour if you need to.
- 2 eggs, beaten—these serve as the magical binding agent to hold everything together. You can use flax eggs for a vegan alternative if that's your jam!
- 1 teaspoon of garlic powder—this boosts the flavor to new heights. If you’re a garlic lover like me, consider roasting fresh garlic and mashing it to mix in for an even deeper taste.
- 1 teaspoon of paprika—this adds not just flavor but a lovely color too. Smoked paprika can give a different, smokier twist.
- Salt and pepper to taste—never forget to season; it’s the secret to elevating the dish!
- Cooking spray or olive oil—a light coating helps achieve that golden-brown perfection.
The cooking process explained
Ready to put on your apron? Here’s how we’ll create those scrumptious chicken tenders step by step.
- Preheat your oven to 400°F (200°C). This ensures that the chicken cooks evenly and crisps beautifully.
- Set up your breading station: Grab three bowls. In the first, put the flour; in the second, the beaten eggs; and in the third, mix breadcrumbs with garlic powder, paprika, salt, and pepper. It’s like an assembly line of flavor!
- Dredge those chicken strips: Start by coating each chicken strip in flour, shaking off any excess. Next, dip them into the egg, letting any surplus drip back. Finally, roll them in the breadcrumb mixture, ensuring they’re well-coated. This trifecta of flavors is what gives you that stunning crunch!
- Transfer to a baking sheet: Line a sheet with parchment paper and lay out your chicken tenders. Make sure to leave space between them—this helps them crisp up nicely.
- Add a little love: Lightly spray the tenders with cooking spray or drizzle with olive oil, giving them a golden glow during baking.
- Bake for 15-20 minutes: Flip them halfway through to ensure even browning. They’re done when they’re golden and the internal temperature hits 165°F (75°C).
Best way to enjoy it
Now that the tenders are hot and crispy, how do you serve them? The beauty of these bites is their versatility! Pair them with classic ranch or tangy BBQ sauce for a dipping extravaganza. Fresh veggies on the side or a light salad can balance out the meal perfectly.
For a fun twist, try them on a bed of lettuce with a sprinkle of cheese and your favorite toppings—say hello to a zero-carb chicken tender salad! Kids will love them in wraps or as a classy slider.
Storage and reheating tips
Look at you, whipping up these delicious tenders! Now, if you happen to have leftovers (though I can’t imagine that happening!), let’s talk storage. Once they’ve cooled, transfer them to an airtight container. They’ll stay fresh for about 3-4 days in the fridge.
Want to keep them longer? Freeze them! Place them in a single layer on a baking sheet until solid, then move them to a freezer bag. They’ll be good for about 2-3 months. When you’re ready to munch, reheat in the oven for best results—you’ll reignite that crispiness!
Pro chef tips
Let’s level up your cooking game! Here are a few nuggets of wisdom:
- Don’t rush the breading: Make sure you thoroughly coat each chicken piece. It’s the secret to that irresistible crunch!
- Toast your breadcrumbs: A quick toast in the oven or sautéing in a little oil first can add an extra layer of nuttiness.
- Experiment with spices: Feel free to jazz up your breadcrumb mix with Italian herbs, or even a touch of cayenne for heat!
- Use a meat thermometer: It’s a foolproof way to ensure that your chicken is perfectly cooked.
Creative Twists
Getting creative in the kitchen can be half the fun! To switch things up, try:
- Different breadcrumbs: Explore flavors with seasoned breadcrumbs or even crushed cornflakes for a unique crunch.
- Cheesy goodness: Mix in some grated Parmesan with the breadcrumbs for a cheesy, savory flavor.
- Spicy heat: Add a little cayenne pepper to the breadcrumb mix or marinate the chicken in some hot sauce before breading.
- Herb-infused: Basil, oregano, or thyme mixed into your breadcrumbs can bring a fresh twist reminiscent of Italian flavors.
Ingredients list
- 1 pound chicken breasts, cut into strips
- 1 cup breadcrumbs
- 1/2 cup flour
- 2 eggs, beaten
- 1 teaspoon garlic powder
- 1 teaspoon paprika
- Salt and pepper to taste
- Cooking spray or olive oil
Step-by-step instructions
- Preheat the oven to 400°F (200°C).
- Set up three bowls: flour, beaten eggs, and a mix of breadcrumbs, garlic powder, paprika, salt, and pepper.
- Dredge each chicken strip in flour, then dip into the egg, and coat with the breadcrumb mixture.
- Place the coated chicken tenders onto a parchment-lined baking sheet.
- Lightly spray with cooking spray or drizzle with olive oil.
- Bake for 15-20 minutes, flipping halfway, until golden brown and cooked through.
Your questions answered
- Can I use chicken thighs? Yes, absolutely! They’ll offer a juicier result.
- How can I make it gluten-free? Use gluten-free flour and breadcrumbs—easy peasy!
- What dipping sauce pairs best? BBQ, ranch, or even honey mustard are fan favorites.
- Can I prep these in advance? Sure! Bread the chicken ahead of time, refrigerate, and bake when you're ready.
- What's the best way to store leftovers? Place them in an airtight container in the fridge for up to 4 days.
I’ve shared all my secrets and tips, so now it’s your turn to shine. Get in that kitchen and create these delightful chicken tenders! Whether it's for a cozy family dinner or a fun gathering, I can’t wait to hear how they turn out for you. Remember, cooking is about love, creativity, and a dash of joy. Go on, make it yours!