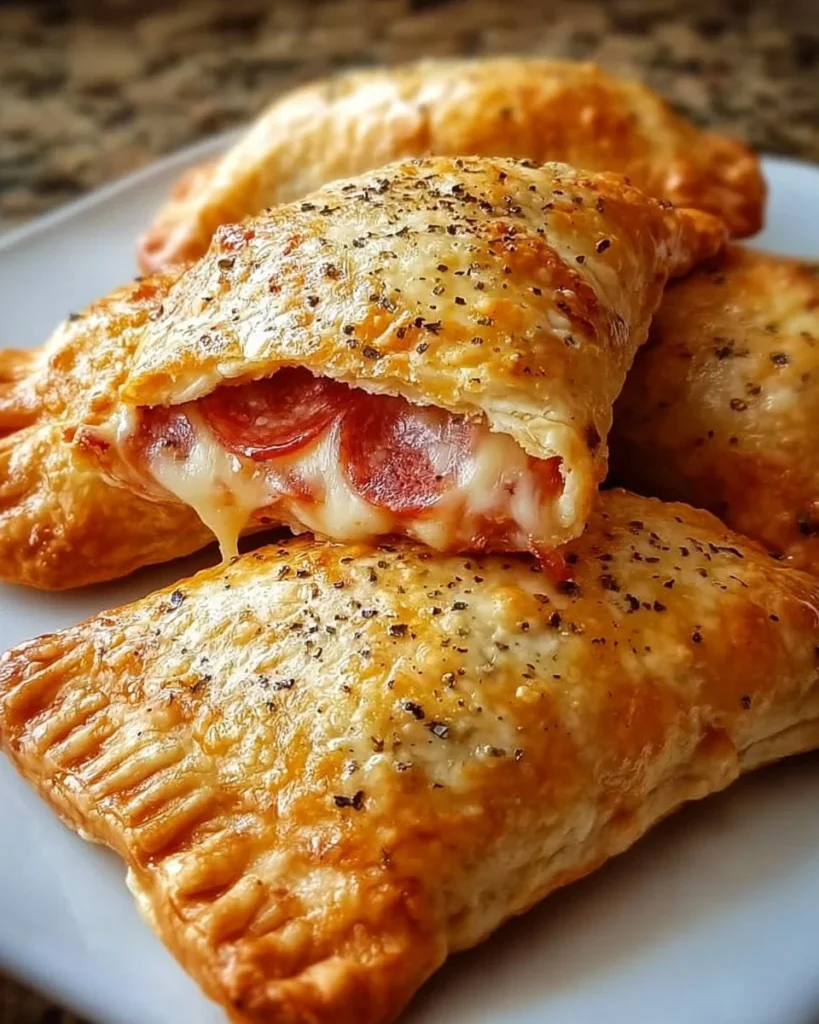
There’s something deeply satisfying about homemade snacks, isn’t there? As soon as I take a bite of a cheesy, gooey pizza pocket, I’m whisked back to my childhood, where the kitchen was alive with laughter, flour dust, and the tantalizing aroma of melting cheese. This recipe has become a cherished ritual in my home—whether it’s movie night, a casual get-together, or just a cozy afternoon snack, these cheesy pizza pockets never fail to deliver smiles.
Why you’ll love this recipe
Let’s talk about why these pizza pockets are the ultimate comfort food. Think about it: crisp, golden dough wrapped around a treasure trove of your favorite pizza fillings. You can customize these little wonders to your heart’s content! Got some mushrooms languishing in the fridge? Toss ’em in! A few bell peppers? Yes, please. They make the perfect snack, satisfying cravings while giving you the flexibility to use whatever ingredients you have on hand.
The real beauty of these pizza pockets lies in their simplicity and speed. You’re not slaving away for hours in the kitchen. Instead, in about 30 minutes, you can go from oven to table with these delightful bites. Everything comes together effortlessly—why order takeout when you can create a golden-brown masterpiece from the comfort of your own kitchen?
Gather these ingredients
Crescent roll dough or pizza dough: The foundation! You can use either depending on your mood. The crescent roll option gives a flakier texture, while pizza dough offers a classic base that holds everything together well. A note here: if you’re feeling ambitious, homemade dough can take this dish to another level!
Pizza sauce: You’ll need about half a cup to spread on your dough. The key here is to use a sauce that you love, as it’s going to soak into every pocket of cheesy goodness. Consider making your own sauce if you’re feeling adventurous. And don’t forget—save a little extra for dipping!
Shredded mozzarella cheese: Ah, the star of the show! About a cup of mozzarella brings that ooey-gooey, stretchy cheese experience we all adore. You can swap this out for provolone, cheddar, or even a dairy-free option if that suits your taste.
Pepperoni slices: Half a cup will do! These savory little circles add a punch of flavor that pairs perfectly with the cheese. But feel free to experiment!
Optional add-ins: If you’re like me, toppings are where the magic happens. Consider adding mushrooms, bell peppers, or even sausage for that extra jolt of flavor. The more, the merrier!
Garlic powder and Italian seasoning: A mere sprinkle (¼ teaspoon each) can elevate these bites, adding that aromatic Italian vibe.
Olive oil or melted butter: For a beautiful golden-brown finish, brush these on before baking. They’ll also help the Parmesan stick!
Grated Parmesan cheese: A light dusting before they go in the oven seals the deal with a salty, savory kick that takes these pockets from good to legendary.
Preparing Homemade Cheesy Pizza Pockets for a Perfect Snack
Start by preheating your oven to 375°F (190°C). This is key to achieving that crispy, golden finish.
Roll out your dough on a floured surface. If you’re using crescent roll dough, ensure you piece the triangles together to form rectangles. No dough left behind!
Once you have your rectangles, spread pizza sauce generously on each piece—don’t be shy!
Next, sprinkle a healthy layer of mozzarella cheese over the sauce, then layer on your pepperoni slices (and any other toppings you’re using).
Fold the dough over the filling like a little pocket of joy, pinching the edges to seal in all that goodness. Go ahead and get your hands a little messy; it’s part of the fun!
Brush the tops with olive oil or melted butter, then sprinkle with Parmesan cheese to add that extra layer of flavor.
Now, bake those bad boys for about 12-15 minutes until they’re golden brown and irresistible.
Once they’re done, serve them warm with extra pizza sauce on the side for dipping—trust me, it makes all the difference!
Best way to enjoy it
The sheer joy of sinking your teeth into a warm, cheesy pizza pocket is something to write home about. To elevate this snack further, consider serving them with a light salad for a refreshing counterbalance. Pair them with a cold soda or your favorite beer if it’s a weekend treat, or enjoy them solo while binge-watching your favorite show—they’re equal-opportunity delights!
How to store and freeze
If you happen to have any leftovers (though I doubt it!), they store exceptionally well. Place your cooled pizza pockets in an airtight container and keep them in the fridge for up to three days. To reheat, pop them in the oven for a few minutes until warm, which helps preserve their delightful crispness.
Want to batch-make for busy weeknights? Feel free to freeze them! Before baking, individually wrap each pocket in plastic wrap, then a layer of foil, and store in a freezer-safe bag. When you’re ready for a snack, bake from frozen; just add a few extra minutes to the cooking time.
Helpful cooking tips
For extra flavor, try toasting the garlic powder and Italian seasoning in the olive oil or butter before brushing them on the pockets. It brings out the essential oils and enhances the aroma!
If you’re using pizza dough, it might be a tad thicker than crescent dough, so ensure you don’t overstuff—it should fold easily without bursting at the seams.
Don’t skip the sealing step! A tight pinch keeps all that melty goodness inside, so be thorough and make sure there are no gaps.
Creative Twists
Feel free to get wild with your flavor combinations! Think about barbecue chicken instead of a classic tomato base, or perhaps a pesto twist with sun-dried tomatoes and feta. You can also explore different cheeses like pepper jack for a spicy kick. The sky’s the limit, and I encourage you to get creative!
Your questions answered
Can I use store-bought pizza sauce?
Absolutely! Just ensure it’s your favorite so that the flavor shines through.What if I don’t like pepperoni?
No problem! Feel free to substitute with any protein or veggie you prefer—chicken, ham, or even just a medley of veggies.How long do these take to make?
The whole process from start to finish takes about 30 minutes, making it a quick and fulfilling snack.What’s the best dipping sauce?
Besides pizza sauce, ranch or garlic aioli also pairs beautifully for those who enjoy a creamy dip.Can I make these ahead of time?
Yes, you can prepare them and keep them in the fridge for a day before baking—just add a few minutes to your baking time.
Cooking is all about experimentation and sharing cherished moments around the table. I truly hope you give these cheesy pizza pockets a try, and invite your family or friends to join in the fun. Remember, every pocket can tell a different story, and I can’t wait to hear what you create! So roll up your sleeves, grab those ingredients, and let’s make some magic happen in the kitchen!

Homemade Cheesy Pizza Pockets for a Perfect Snack
Description
These cheesy pizza pockets are the ultimate comfort food, filled with gooey cheese and savory toppings, all encased in a golden-brown crust.Ingredients
Main Ingredients
Instructions
Preparation Steps
Preheat oven
Preheat your oven to 375°F (190°C).Prepare the dough
Roll out your dough on a floured surface and shape it into rectangles if using crescent dough.Spread sauce
Spread pizza sauce generously on each piece of dough.Add cheese and toppings
Sprinkle mozzarella over the sauce, layer with pepperoni and any other toppings.Seal the pockets
Fold the dough over the filling and pinch the edges to seal.Brush and sprinkle
Brush with olive oil or melted butter, then sprinkle with Parmesan cheese.Bake
Bake for about 12-15 minutes until golden brown.Serve
Serve warm with extra pizza sauce for dipping.
Nutrition Facts
Servings 4
- Amount Per Serving
- Calories 300kcal
- % Daily Value *
- Total Fat 15g24%
- Saturated Fat 7g35%
- Trans Fat 0g
- Cholesterol 25mg9%
- Sodium 500mg21%
- Potassium 200mg6%
- Total Carbohydrate 30g10%
- Dietary Fiber 1g4%
- Sugars 2g
- Protein 10g20%
- Vitamin A 200 IU
- Vitamin C 2 mg
- Calcium 250 mg
- Iron 1 mg
* Percent Daily Values are based on a 2,000 calorie diet. Your daily value may be higher or lower depending on your calorie needs.