Ah, Gnome Mini Cheesecakes—where whimsy meets pure deliciousness! Let me take you on a little journey through this charming treat. If you’ve ever wandered into a magical garden or stumbled upon a fairy tale, these desserts evoke just that—a sprinkle of enchantment in every bite. I whipped these up one summer evening while reminiscing about my childhood, a time filled with curiosity and joy. Whenever I’d take a bite, it felt like I was back in that garden, laughter mingling with the sweetness in the air.
Why you’ll love this recipe
Okay, let me set the scene: creamy, dreamy cheesecake meets a buttery graham cracker crust, all topped generously with fresh strawberries. Doesn’t that sound divine? These Gnome Mini Cheesecakes are not only a feast for the eyes, but they will also leave your taste buds dancing in pure delight. The contrast between the rich filling and the slightly crunchy crust creates a symphony of textures that you just can’t resist.
Not only are they super easy to make, but they also have this charming aesthetic that makes them perfect for any gathering, from cozy family dinners to elegant parties. Let’s be honest, who wouldn’t be drawn to such an adorable little dessert? Plus, they’re perfectly portioned, so you can indulge without the guilt. Each bite is filled with sweetness, love, and a little secret that I’ll share with you—these cheesecakes are a mini celebration of happiness!
Gather these ingredients
Now, let’s get down to the heart of it all—the ingredients! You’ll need:
8 oz cream cheese, softened: This is the star of the show. It brings that creamy, luscious texture we all crave in a cheesecake. Make sure to let it soften to room temperature; no one wants lumps!
1/2 cup sugar: Just the right amount to sweeten the deal without overwhelming the tanginess of the cream cheese. If you’re feeling adventurous, you can even substitute this with a natural sweetener like honey or maple syrup.
1 tsp vanilla extract: A dash of this liquid gold adds depth and warmth. The flavor binds beautifully with the cream cheese and sugar. Oh, how I adore the aroma it brings to the mix!
1 cup whipped cream: Light and airy, it makes our filling as fluffy as a cloud. And who doesn’t love clouds? Just be sure to gently fold it in so we keep that wonderful texture!
1 cup graham cracker crumbs: Here’s where the magic happens! These little crumbs create a delightful crust that brings a satisfying crunch, contrasting perfectly with the smooth filling.
1/4 cup butter, melted: This binds our crust beautifully while adding richness. Make sure it’s melted, or you might end up with some dry bits.
Strawberries, for topping: Fresh, juicy strawberries add that pop of color and a delightful tartness to balance out the creaminess. And you can never go wrong with strawberries!
How this recipe comes together
Preheat the oven to 325°F (163°C). It’s essential for ensuring even baking.
In a bowl, mix graham cracker crumbs with melted butter until you get a sandy texture. You want it moist enough to hold together, kind of like wet sand at the beach.
Press the mixture into the bottom of mini cheesecake pans. Press firmly, like you’re packing tiny sandcastles!
In another bowl, blend cream cheese, sugar, and vanilla extract until smooth. You want it to be silky—no lumps, please!
Gently fold in the whipped cream until fully combined. Think of it like tucking a warm blanket around a little cheesecake; you want to maintain that fluffiness!
Pour the cheesecake filling over the crust in the mini pans. Fill them generously; they deserve a good amount of filling.
Bake for 15-20 minutes until set. The centers should have a slight jiggle; trust me, that’s the sweet spot!
Let cool. Once cooled, refrigerate for at least 2 hours to firm up. This is the hardest part; the waiting is torture, but so worth it!
Top with strawberries before serving. Let’s finish it off with a pop of freshness!
Best way to enjoy it
These mini cheesecakes are like little troops of happiness, ready to impress! Serve them on delicate plates, adorned with fresh mint leaves for an extra touch of elegance. If you’re feeling fancy, drizzle some strawberry sauce or a chocolate ganache over them—let your imagination run wild! Pair them with a lightened tea or a bubbly beverage to enhance that garden party vibe.
The best way to save extras
Alright, let’s talk about how to keep those little gems fresh. Store any leftovers in an airtight container in the fridge. They’ll be good for about 3-4 days—if they last that long! I wouldn’t recommend freezing them as the texture may change upon thawing. But trust me, they’re best enjoyed fresh!
Helpful cooking tips
- Be careful to not over-mix your cream cheese mixture once you add the whipped cream; that lovely fluffiness is key!
- Use a water bath if you want to up your cheesecake game. Placing the mini pans in a larger pan with water helps ensure even baking and prevents cracks (not that these little guys will crack, but it never hurts to be cautious!).
Creative Twists
Feeling adventurous? Try switching up the flavors! Add a tablespoon of lemon zest or cocoa powder to the cream cheese mixture for a delightful twist. You could even swap out the strawberries for a berry medley—raspberries, blueberries, you name it! If fruits aren’t your thing, consider topping with crushed pretzels for that sweet-salty combo that’ll rock your world!
Ingredients
- 8 oz cream cheese, softened
- 1/2 cup sugar
- 1 tsp vanilla extract
- 1 cup whipped cream
- 1 cup graham cracker crumbs
- 1/4 cup butter, melted
- Strawberries, for topping
Step-by-step instructions
- Preheat the oven to 325°F (163°C).
- Mix graham cracker crumbs with melted butter in a bowl until well combined.
- Press the mixture into the bottom of mini cheesecake pans.
- Blend cream cheese, sugar, and vanilla extract in another bowl until smooth.
- Fold in the whipped cream gently until combined.
- Pour the cheesecake filling over the crust in the mini pans.
- Bake for 15-20 minutes until set—not too jiggly!
- Let cool, then refrigerate for at least 2 hours.
- Top with strawberries before serving.
Your questions answered
- How long do these mini cheesecakes take to make? About an hour, plus chilling time.
- Can I use low-fat cream cheese? Absolutely! It may alter the taste slightly, but it works just fine.
- Do they need to be made ahead of time? Yes! They taste even better after chilling overnight.
- Can I use another type of fruit? Yes! Feel free to change it up with any favorite fruit.
- Is there a gluten-free option for the crust? Definitely! Use crushed gluten-free cookies or almonds instead.
So there you have it! These charming Gnome Mini Cheesecakes are more than just a dessert; they’re a ticket to nostalgia, joy, and a dash of culinary magic. Give it a go, play with flavors, and most importantly, share the love. I can’t wait to hear about your baking adventures! What delightful twists will you bring to this recipe? 🍰✨
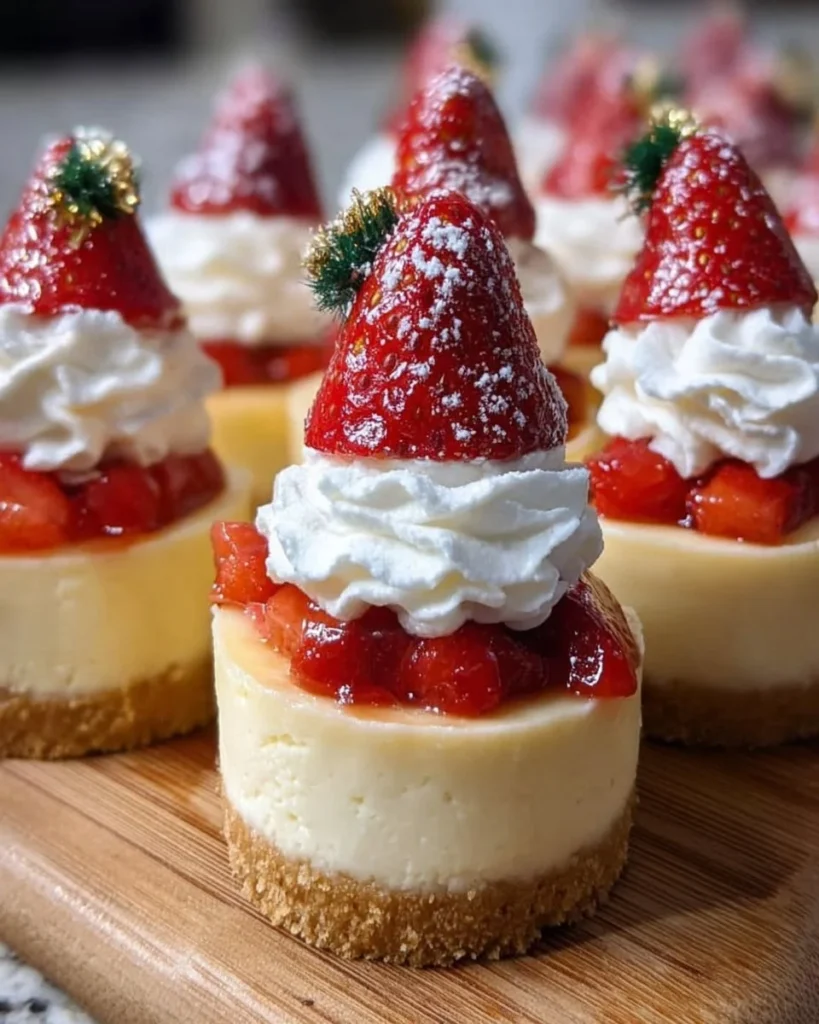

Gnome Mini Cheesecakes
Description
Delightful mini cheesecakes with a buttery graham cracker crust and topped with fresh strawberries.Ingredients
For the Cheesecake
Instructions
Baking the Mini Cheesecakes
Preheat the Oven
Preheat the oven to 325°F (163°C).Prepare the Crust
Mix graham cracker crumbs with melted butter until well combined. Press the mixture into the bottom of mini cheesecake pans.Pack it down firmly.Make the Filling
Blend cream cheese, sugar, and vanilla extract in another bowl until smooth. Fold in the whipped cream gently until combined.Avoid over-mixing to maintain fluffiness.Fill and Bake
Pour the cheesecake filling over the crust in the mini pans and bake for 15-20 minutes until set.There should be a slight jiggle in the center.Cool and Chill
Let cool, then refrigerate for at least 2 hours.This step is crucial for setting.Serve
Top with strawberries before serving.
Nutrition Facts
Servings 12
- Amount Per Serving
- Calories 150kcal
- % Daily Value *
- Total Fat 11g17%
- Saturated Fat 7g35%
- Trans Fat 0g
- Cholesterol 35mg12%
- Sodium 120mg5%
- Potassium 60mg2%
- Total Carbohydrate 15g5%
- Dietary Fiber 0g
- Sugars 10g
- Protein 3g6%
- Vitamin A 200 IU
- Vitamin C 5 mg
- Calcium 50 mg
- Iron 0.5 mg
- Vitamin D 0 IU
- Vitamin E 0 IU
- Vitamin K 0 mcg
- Thiamin 0 mg
- Riboflavin 0 mg
- Niacin 0 mg
- Vitamin B6 0 mg
- Folate 0 mcg
- Vitamin B12 0 mcg
- Biotin 0 mcg
- Pantothenic Acid 0 mg
- Phosphorus 50 mg
- Iodine 0 mcg
- Magnesium 10 mg
- Zinc 0 mg
- Selenium 0 mcg
- Copper 0 mg
- Manganese 0 mg
- Chromium 0 mcg
- Molybdenum 0 mcg
- Chloride 0 mg
* Percent Daily Values are based on a 2,000 calorie diet. Your daily value may be higher or lower depending on your calorie needs.