There’s something incredibly comforting about a warm pot pie, don’t you think? It brings back memories of Sunday dinners at home, with the aroma wafting through the house as an invitation for everyone to gather around the table. Today, I’m thrilled to share a recipe that combines two of my favorite things: the classic chicken pot pie and those irresistible cheesy biscuits from Red Lobster. Trust me, once you whip up this Red Lobster Biscuit Chicken Pot Pie, your kitchen will be the heartbeat of your home.
Why you’ll love this recipe
This dish isn’t just a pot pie; it’s a warm hug on a plate. Picture it: tender, seasoned chicken mingling with vibrant vegetables, all hugged by a creamy sauce that whispers savory secrets, topped with golden, cheesy biscuits that cradle it like a protective layer. What makes this recipe special? First off, it’s super simple to prepare, especially if you opt for rotisserie chicken—saving time without skimping on flavor is always a win in my book. Plus, the addition of garlic powder both in the filling and the biscuits adds a delightful aroma that lingers as your dish bakes away in the oven. With each bite, you’ll be met with flaky, buttery goodness that makes you want to savor every mouthful.
This pot pie checks all the boxes: it’s comforting, hearty, and just plain delicious. Grab a fork and dig in—because this isn’t just dinner; it’s an experience. Oh, and don’t worry—your family or guests will certainly be asking for seconds!
Gather these ingredients
Let’s round up everything you need to create this cozy culinary masterpiece.
3 cups cooked chicken, diced: Rotisserie chicken is a fantastic time-saver, but if you have leftover roasted chicken lying around, that works too! Just ensure the chicken is nice and tender.
1 cup frozen mixed vegetables: I love the convenience of frozen peas, carrots, and corn. They retain their bite and flavor, adding that perfect crunch.
1 cup cream of chicken soup: This adds creaminess and a depth of flavor that really binds the whole pot pie together. You could also swap this for homemade chicken gravy if you’re looking for a punch of flavor.
1 teaspoon garlic powder: You’ll use this in both the chicken filling and the biscuit batter for that extra kick. It’s pure magic!
1 teaspoon onion powder: A little enhances the savory profile without the fuss of chopping onions.
Salt and pepper: Essential for balancing flavors—don’t hesitate to adjust these to your liking!
1/2 cup chicken broth: For a little extra moisture and flavor. You can use low-sodium broth if you’re watching your salt intake.
2 1/2 cups all-purpose flour: This is the base for your biscuit topping and will provide that lovely, fluffy texture.
1 tablespoon baking powder: This is your leavening agent, ensuring those biscuits rise beautifully.
1 teaspoon salt: For flavor in the biscuit dough.
1/2 cup unsalted butter, cold and cubed: Cold butter is critical—when it melts during baking, it creates those flaky layers you want in a biscuit.
1 cup shredded cheddar cheese: Because everything is better with cheese! Feel free to experiment with different cheeses, like gouda or pepper jack, for varied flavors.
3/4 cup milk: This will bring the dough together beautifully without being too wet.
1 tablespoon garlic powder: Yep, you’ll sprinkle a little in the biscuits to give them that unmistakable Red Lobster flair.
Preparing Red Lobster Biscuit Chicken Pot Pie
- Preheat your oven to 375°F (190°C).
- In a large mixing bowl, combine the cooked chicken, frozen mixed vegetables, cream of chicken soup, garlic powder, onion powder, salt, pepper, and chicken broth. Mix well until everything is incorporated.
- Transfer the filling to your casserole or pie dish, smoothing it out evenly.
- In another bowl, whisk together the flour, baking powder, and salt for the biscuit topping. Now, cut in the cold butter until the mixture looks like coarse crumbs. This step is key—don’t rush it!
- Stir in the shredded cheddar cheese and that extra tablespoon of garlic powder. Gradually add the milk, mixing just until everything comes together—overmixing will make the biscuits tough, and we don’t want that!
- Drop spoonfuls of the biscuit dough over the chicken filling, aiming for an even coverage. Think of it like a cozy blanket for your filling.
- Bake in the oven for about 30 minutes, or until the biscuit topping achieves a glorious golden brown and the filling is bubbling up joyfully from underneath.
- Let it cool for a few minutes before digging in—it’ll be hard, but trust me, it’s worth the wait!
Best way to enjoy it
Serve this delightful dish hot from the oven, maybe with a simple side salad or some buttery corn on the cob for that ultimate comfort food meal. You could also pair it with a nice white wine if you’re feeling fancy.
Storage and reheating tips
If you find yourself with leftovers (which is a rare treat!), allow the pot pie to cool completely before covering it tightly with foil or plastic wrap. Store it in the fridge for up to 3 days. When you’re ready to enjoy it again, simply reheat individual servings in the microwave or pop the whole dish back in the oven at 350°F (175°C) until warmed through. If you plan on freezing some of this goodness, I recommend freezing before baking, allowing the filling to cool, then covering it securely for up to 3 months.
Pro chef tips
- If you truly want to elevate your dish, toss in a splash of white wine when mixing the filling for a depth of flavor that sings.
- Consider adding a pinch of cayenne pepper for a little heat—you’ll be surprised at how well it works with the creamy elements.
- Remember, don’t overmix your biscuit dough—it should be just combined for that fluffy texture.
Creative Twists
Want to customize? You could swap out the mixed veggies for fresh ones—just sauté them briefly before adding. If you’re feeling adventurous, try diced mushrooms or spinach! For a more southern twist, mix in some cooked crumbled bacon to the filling for rich, smoky undertones.
Your questions answered
- How long does it take to prepare? About 20-30 minutes of prep time and 30 minutes of baking time, so a little over an hour from start to delicious finish.
- Can I make this vegetarian? Absolutely! Just replace the chicken with your favorite plant-based protein and use vegetable broth instead.
- What should I serve with pot pie? A fresh, crisp salad or roasted vegetables pair well.
- Is it suitable for freezing? Yes! You can freeze before baking or after it’s fully baked. Just ensure it’s well-sealed.
- How many servings does it yield? This recipe typically serves about 4-6, depending on portion size.
Just imagine yourself sitting down to a warm bowl of this Red Lobster Biscuit Chicken Pot Pie, laughter filling the room as everyone digs in. You genuinely can’t go wrong with this dish. Give it a shot, and don’t forget to add your personal touches—cooking should always feel like an adventure! I can’t wait to hear how it turns out for you.

Red Lobster Biscuit Chicken Pot Pie
Description
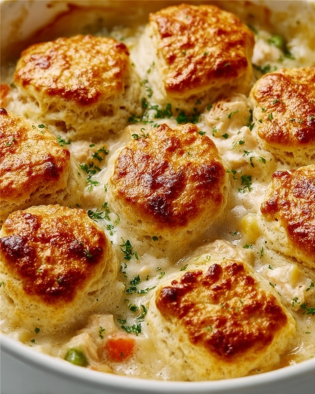
This Red Lobster Biscuit Chicken Pot Pie combines tender chicken, vibrant vegetables, and a creamy filling, topped with fluffy, cheesy biscuits. Perfect for a comforting family dinner.
Ingredients
Filling
Biscuit Topping
Instructions
Prepare the Pie
Preheat the oven
Preheat your oven to 375°F (190°C).Make the Filling
In a large mixing bowl, combine the cooked chicken, frozen mixed vegetables, cream of chicken soup, garlic powder, onion powder, salt, pepper, and chicken broth. Mix well until everything is incorporated.Transfer Filling
Transfer the filling to your casserole or pie dish, smoothing it out evenly.Prepare Biscuit Dough
In another bowl, whisk together the flour, baking powder, and salt for the biscuit topping. Cut in the cold butter until the mixture looks like coarse crumbs.This step is key for flaky biscuits.Combine Ingredients
Stir in the shredded cheddar cheese and the extra tablespoon of garlic powder. Gradually add the milk, mixing just until everything comes together.Do not overmix.Add Biscuit Topping
Drop spoonfuls of the biscuit dough over the chicken filling, aiming for an even coverage.Bake
Bake in the oven for about 30 minutes, or until the biscuit topping is golden brown and the filling is bubbling.Cool and Serve
Let it cool for a few minutes before serving hot.
Nutrition Facts
Servings 6
- Amount Per Serving
- Calories 450kcal
- % Daily Value *
- Total Fat 20g31%
- Saturated Fat 10g50%
- Trans Fat 0g
- Cholesterol 70mg24%
- Sodium 600mg25%
- Potassium 500mg15%
- Total Carbohydrate 40g14%
- Dietary Fiber 2g8%
- Sugars 2g
- Protein 25g50%
- Vitamin A 600 IU
- Vitamin C 15 mg
- Calcium 250 mg
- Iron 3 mg
- Vitamin D 0 IU
- Vitamin E 1 IU
- Vitamin K 2 mcg
- Thiamin 0.1 mg
- Riboflavin 0.3 mg
- Niacin 4 mg
- Vitamin B6 0.2 mg
- Folate 50 mcg
- Vitamin B12 2 mcg
- Pantothenic Acid 0.5 mg
- Phosphorus 200 mg
- Magnesium 20 mg
- Zinc 1 mg
- Selenium 25 mcg
- Copper 0.1 mg
- Manganese 0.5 mg
* Percent Daily Values are based on a 2,000 calorie diet. Your daily value may be higher or lower depending on your calorie needs.
Note
Serve with a side salad or corn on the cob.